CuriousY A world with wonder

About convolutional neural network

| Comment

其实关于CNN很早之前就已经知道了它大概是什么原理,以及它为何比人为提取的特征用来训练得到的效果更好。可以说CNN几乎终结了计算机视觉领域靠人为提取特征的时代(也就是我刚开始学习进入这领域的时候😂)。

但这里我想从头梳理一遍,以普通的神经网络为切入点,换个角度研究下CNN。

  1. 总体而言,CNN和普通的神经网络的区别:

    First of all, the layers are organised in 3 dimensions: width, height and depth. Further, the neurons in one layer do not connect to all the neurons in the next layer but only to a small region of it. Lastly, the final output will be reduced to a single vector of probability scores, organized along the depth dimension.

    Normal NN vs CNN. — Source: <http://cs231n.github.io/convolutional-networks/>

  2. CNN中一共有这么几种layer:

    • INPUT [32x32x3] will hold the raw pixel values of the image, in this case an image of width 32, height 32, and with three color channels R,G,B.
    • CONV layer will compute the output of neurons that are connected to local regions in the input, each computing a dot product between their weights and a small region they are connected to in the input volume. This may result in volume such as [32x32x12] if we decided to use 12 filters.
    • RELU layer will apply an elementwise activation function, such as the max(0,x) thresholding at zero. This leaves the size of the volume unchanged ([32x32x12]).
    • POOL layer will perform a downsampling operation along the spatial dimensions (width, height), resulting in volume such as [16x16x12].
    • FC (i.e. fully-connected) layer will compute the class scores, resulting in volume of size [1x1x10], where each of the 10 numbers correspond to a class score, such as among the 10 categories of CIFAR-10. As with ordinary Neural Networks and as the name implies, each neuron in this layer will be connected to all the numbers in the previous volume.

    INPUT就不说了,CONV是卷积层,也是CNN的核心,卷积层最大的特点(相比于一般的NN)是它只关注输入的局部信息;RELU层的作用应该和普通的NN差不多:注入一些非线性的因素;POOL是池化层,作用类似于降采样,降采样后再输入到下一层卷积层,那么更全局的信息就被关注到了,可以有效的降低overfitting(试想下如果只给你看树叶的纹路,鬼能看得出这是什么树)和提高robust(即使图像有一些平移或旋转,降采样后可能是一样的,所以没有太大影响);FC是全连接层,可以理解为就是把之前各种卷积、池化等操作之后的输出展开为一维的向量,再输入到了一个普通的神经网络中(普通的NN中每一层都是全连接的)。

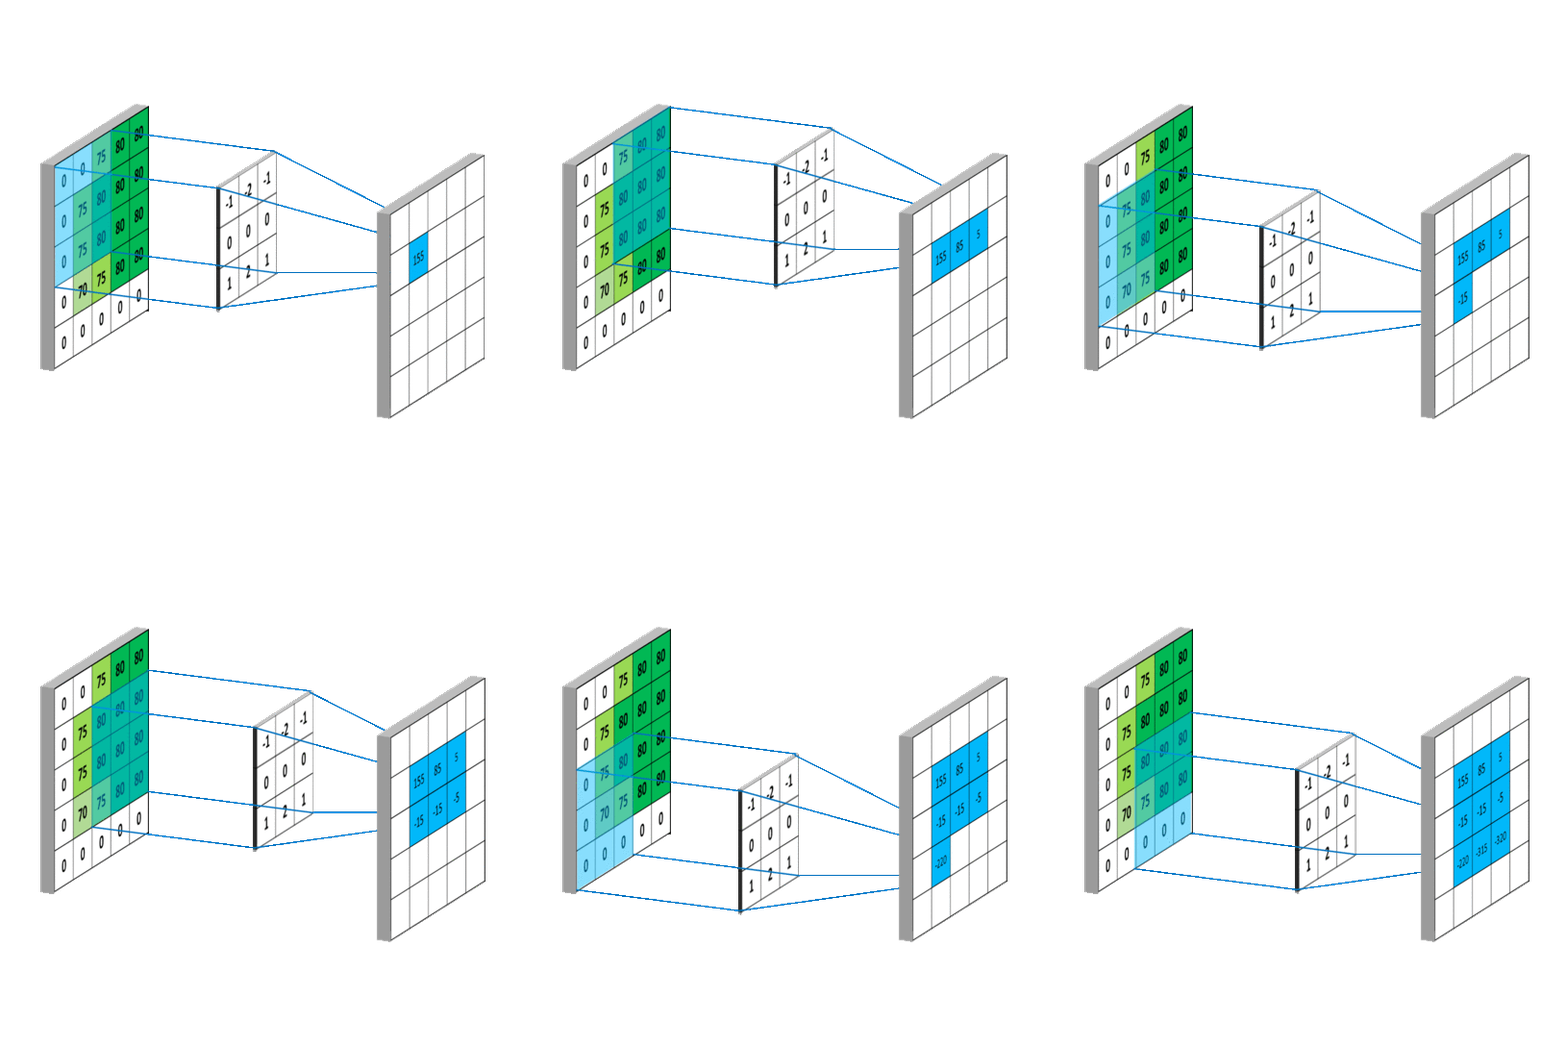
  3. 关于卷积:卷积其实就是加权叠加,在图像处理中通常会选用一个较小的矩阵模板(也叫描述子或卷积核,比如一个3x3的矩阵)来对图像中的每一个像素和其周围部分像素进行加权叠加计算,从而得到一个全新的图像(对于图像边缘的像素,一般会采取镜像操作来填充一些图像外的点来计算,以保证卷积过后的图像尺寸不变,比如要在图像[5,0]处和3x3的矩阵进行卷积,那么我们会用[5,1]处的图像像素来填充到[5,-1]的位置,然后就可以进行卷积啦)。图像卷积在图像处理中的应用非常广泛,比如图像的去噪、锐化、模糊化、边缘检测等等,这些操作其实都是在图像上进行卷积,所不同的是它们使用的卷积核不同罢了。 An example
Read more

About neural network

| Comment
  1. 学习率是指每次进行梯度下降时,各个参数按照梯度进行调整的比例。学习率越高,则每次迭代参数调整得越大,训练的效率也就越高;但学习率太高,可能会导致训练无法收敛到最佳。

    It will turn out that the setting of the step size is very imporant and tricky. Small step size will make your model slow to train. Large step size will train faster, but if it is too large, it will make your classifier chaotically jump around and not converge to a good final result.

  2. 为了达到更好的训练效果,学习率在训练过程一般都会用一些算法来动态地调整,比如说让梯度一直都很小的weight偶尔可以以较大的学习率来改变下。现在用的比较多的是Adam方法(参考这里)。

  3. 目前,神经网络的隐层的激活函数一般选择ReLu函数(sigmoid函数或tanh函数也可以,但存在vanishing gradient问题,会导致某些情况下训练效率很低),而输出层则一般会根据需求来定:

    • 用于回归一般选择线性函数即可(因为没有边界的要求)
    • 用于分类则使用softmax函数或sigmoid函数

    (参考这里)

  4. 激活函数选择ReLu函数还有一个原因是它的值的计算以及梯度的计算都非常简单,对于深度的神经网络而言减少训练的计算量还是挺重要的。(ReLu函数存在dying ReLu problem,但通过简单地修改可以克服这个问题,参考这里

  5. 同样学习率、同样的训练迭代次数下,如果训练得到的模型预测误差仍不同,则还有可能是每次训练的权重的初始值不同且迭代次数不足导致。

  6. 我们是根据损失函数(loss function)来反向传播并计算梯度的,而损失函数一般分为两部分:

    J(w) = L(w) + R(w)
    

    其中L(w)计算的是预测值与真实值的差距,可以理解为实实在在的损失,R(w)是所有和输入的feature相关的权重有关的函数,目的是防止某些权重过大,导致某些feature的话语权太大压制了其他的输入(即Regularization),因为真实世界中收集得到的输入总会有噪音,一旦噪音的话语权太大就会导致模型预测不准确(即overfitting)。

  7. 一些损失函数对于网络的输出是有要求的(或者说,一些网络的输出限制了我们对于损失函数的选择)。比如Hinge Loss,它的损失只有在输出大于等于+m或小于等于-m(m为margin,即SVM中两个超平面的距离的一半)时为0,因此如果神经网络的输出层激活函数使用的是sigmoid函数,那计算得到的损失就是不准确的(sigmoid函数输出为0到1区间)。

Read more

Use Express inside Electron App, or NOT

| Comment

前端js代码在浏览器中运行时是放在沙盒中的,因此有很多的限制,比如不能直接访问本地的文件。而Electron虽然是基于浏览器内核,但移除了这些限制,所以完全可以在前端的代码中使用Node.js的库(某种意义上来说,这里已经不区分前端和后端了,但事实上许多代码是重用/按照原先前端的代码来写的)。

在Electron的世界里,你完全可以在React的组件中直接读取本地的文件并显示出来!那为什么我们还要在Electron中放一个后端的http server?

Why

从我的角度来看,首先是因为这样的开发体验是统一的。大多数的前端开发者已经习惯了通过向后端发送请求来获取资源的方式,而在前端代码中夹杂Node.js代码则让人有点“膈应”。其次,是为了减少代码的开发和维护。有些项目原本是使用C/S架构的,但又想提供一个桌面的本地应用,将整个前后端打包放到一起是最省事的。

Why not

恰好社区也有人问了这个问题,这里是一些答案:

You could and some people have, but bear in mind that this would incur the overhead of HTTP protocol and the full networking stack. So it would have lower performance than the simple pipe used for IPC. It depends on what you want to do and whether you would be running it on devices with weaker processors.

Another thing to keep in mind is that any website the user loads in an external browser can access the Express server you spin up on the user’s machine. I suspect a lot of people spinning up Express on user machines have given little thought to the associated security concerns.

总结一下:

  • HTTP协议会增加数据传输的开销,降低性能。
  • Electron中打包的web server可能被外部访问,有安全隐患。

Typescript初体验

| Comment
  1. 一个library要支持Typescript就需要提供一个index.d.ts文件,并在其中声明可以被import的对象。

    • 有些library自带了index.d.ts文件,那么安装好就能直接用;

    • 有些library并没有对Typescript做原生地支持,可以尝试安装@types/[lib_name]@types是一个专门存放Typescript声明的库,很多library通过第三方在@types中添加了声明也可以很好地支持Typescript,例如:

      yarn add --dev @types/react
      
    • 对于那些以上都不支持的纯Javascript的library(一般是比较冷门的library了),那么可以通过创建一个typings.d.ts文件,并在其中声明该模块来使用(只需要声明模块即可,当然你也可以对其中的每个函数进行Typescript的声明,这样更利于维护),例如:

      declare module "d3"
      
  2. 有时候会碰到因为给定的类型和声明的类型不匹配而编译失败的情况,可以强行指定对象的类型来作为临时的work around(当然不建议这么做):

    myFunc('someInput' as any)
    
  3. 目前(Typescript 2.9.2)对React的defaultProps支持还不是很好,但已经有issue在track这个特性,应该在未来的版本会有比较好的支持。

  4. 通过Typescript的indexable type,我们可以声明一个字典对象:

    interface AnimalGroup {
        [category: string]: {
            description: string,
            count: number,
        };
    }
       
    const zoo: AnimalGroup = {
        cat: {
            description: 'black',
            count: 3,
        },
        tiger: {
            description: 'big',
            count: 2,
        },
    };
    
  5. 由于indexable type很灵活,于是也可以用来声明一个数组:

    interface StringArray {
        [index: number]: string;
    }
       
    let myArray: StringArray;
    myArray = ["Bob", "Fred"];
       
    let myStr: string = myArray[0];
    

    但同时,也可以定义泛型达到类似的效果:

    let myArray: Array<string>;
    myArray = ["Bob", "Fred"];
       
    let myStr: string = myArray[0];
    

    两种方式有什么区别?

    一个比较大的区别是:indexable type缺少泛型类原型支持的方法。比如:

    interface StringArray {
        [index: number]: string;
    }
       
    let myArray: StringArray;
    myArray = ["Bob", "Fred"];
       
    myArray.find(x => x == 'Fred');  // Compile failed as Property 'find' does not exist on type 'StringArray'.
    

Using sphinx to build Python document

| Comment
  1. 使用sphinx-quickstart命令来初始化创建一些必要的文件(建议先创建一个docs文件夹,然后在其中执行该命令)。

  2. 使用sphinx-build命令来生成对应的文档,比如sphinx-build -b html source build会生成html格式的页面。当然,如果你在执行sphinx-quickstart命令时选择了同时生成Makefile的话,则可以通过make html来达到一样的效果。

  3. 使用sphinx-build命令来生成文档时,并不需要指定对应的项目路径,原因在于sphinx是直接在python代码中import你在rst文件中填写的模块的。因此,一定要确保在所有依赖包都安装好的virtualenv中来执行sphinx-build命令(sphinx最好也安装在该virtualenv中),并且,确保对应的项目路径可以在python环境中被import(把项目路径添加到PYTHONPATH环境变量中再执行命令或是在项目路径的父级目录执行命令)。 比如下面的rst:

    .. autoclass:: my_module.sub_module.ClassA
    

    实际上做的事情类似于:

    from my_module.sub_module import ClassA
    
  4. 使用sphinx-apidoc -f -o docs/source projectdir来自动生成对应于项目中每个函数的api的文档。

  5. 建议加入sphinx.ext.napoleon扩展,这样在转换代码中的docstring时会支持google和numpy的风格(example)。

  6. sphinx默认会渲染所有的rst格式的文件,如果想要使用mark down来书写文档的话,需要额外安装解析mark down的库,并设置sphinx来渲染它们(参考http://www.sphinx-doc.org/en/master/usage/markdown.html)。

  7. 避免重复渲染同一个文件:默认所有文件夹下的rst文件都会被sphinx渲染,所以在rst文件中直接引用该文件名即可,而不需要.. include:来引入。 比如,我有一个api.rst文件,我需要在index.rst文件中引用它作为目录:

    .. toctree::
       :maxdepth: 2
       :caption: Contents:
    
       api
    

| Page 4 of 25 |